Azure Cosmos DB

Azure Cosmos DB is Microsoft’s globally distributed, multi-model database. Azure Cosmos DB was built from the ground up with global distribution and horizontal scale at its core. It offers turnkey global distribution across any number of Azure regions by transparently scaling and replicating your data wherever your users are. You can elastically scale throughput and storage worldwide, and only pay for the throughput and storage you need.

Managing Cosmos DB account using PowerShell

https://docs.microsoft.com/en-us/azure/cosmos-db/manage-account-with-powershell

What is Azure Logic Apps?

Logic Apps helps you build, schedule, and automate processes as workflows so you can integrate apps, data, systems, and services across enterprises or organizations. Logic Apps simplifies how you design and create scalable solutions for app integration, data integration, system integration, enterprise application integration (EAI), and business-to-business (B2B) communication, whether in the cloud, on premises, or both.

For example, here are just a few workloads that you can automate with logic apps:

  • Process and route orders across on-premises systems and cloud services.
  • Move uploaded files from an FTP server to Azure Storage.
  • Monitor tweets for a specific subject, analyze the sentiment, and create alerts or tasks for items that need review.

https://docs.microsoft.com/en-us/azure/logic-apps/logic-apps-overview

Azure SQL Database Point in Time Restore

We’re going to look at point-in-time restore, a self-service feature available for Basic, Standard, and Premium databases. In previous posts I described the Azure SQL Database business continuity model which includes point-in-time restore. This model is summarized in the table below. Within this model point-in-time restore is designed for recovering a database from a recent backup after accidental data corruption or deletion.

BCDR option

Basic tier

Standard tier

Premium tier

Point In Time Restore Any restore point within 7 days Any restore point within 14 days Any restore point within 35 days
Geo-Restore ERT* < 12h RPO† < 1h ERT* < 12h RPO† < 1h ERT* < 12h RPO† < 1h
Standard Geo-Replication Not included ERT* < 30s RPO† < 5s ERT* < 30s RPO† < 5s
Active Geo-Replication Not included Not included ERT* < 30s RPO† < 5s

* Estimated Recovery Time (ERT) – The estimated duration for the database to be fully functional after a restore/failover request. † Recovery Point Objective (RPO) – The amount of most recent data changes (time interval) the application could lose after recovery.

What is Point in Time Restore?

The Azure SQL Database service protects all databases with an automated backup system. These backups are retained for 7 days for Basic, 14 days for Standard and 35 days for Premium. Point-in-time restore is a self-service capability, allowing customers to restore a Basic, Standard or Premium database from these backups to any point within the retention period. Point-in-time restore always creates a new database. The database backups are taken automatically with no need to opt-in and no additional charges. You only incur additional cost if you use the restore capability. The new database created by restore is charged at normal database rates. Together, the automated backup system and point-in-time restore provide a zero-cost, zero-admin way to protect databases from accidental corruption or deletion, whatever the cause.

Understanding Automatic Backups

All Basic, Standard, and Premium databases are protected by automatic backups. Full backups are taken every week, differential backups every day, and log backups every 5 minutes. The first full backup is scheduled immediately after a database is created. Normally this completes within 30 minutes but it can take longer. If a database is “born big”, for example if it is created as the result of database copy or restore from a large database, then the first full backup may take longer to complete. After the first full backup all further backups are scheduled automatically and managed silently in the background. Exact timing of full and differential backups is determined by the system to balance overall load. Backup files are stored in geo-redundant storage account with read access (RA-GRS) to ensure backups’ availability for disaster recovery purposes. When you restore a database, the required backup files are retrieved in the same data center and applied.

https://azure.microsoft.com/en-us/blog/azure-sql-database-point-in-time-restore/

PowerShell versus ARM Templates

Let me explain why complete PowerShell deployment would be too slow, and how ARM/JSON is they best way to deploy things in Azure.

With PowerShell you describe the deployment process, one step at a time, connecting each and every dot. The deployment is serialized, with no parallelism unless you use PowerShell features to run parallel jobs. The result isn’t much faster than you doing all the clicking for yourself.

ARM or JSON templates describe the result, not the process. Once you submit the deployment, ARM divides up the job and orders the deployment based on your dependencies. That means that the deployment can be parallelized. If I need 100 web servers, all 100 will be deployed at once, not in some 1..100 loop, one at a time (or 5 at a time if you are clever).

PowerShell Still Required

PowerShell is still very useful for some fiddly deployment things that don’t have ARM options, or are once-offs and don’t have a GUI option. To be honest, I do use GUI for most of my once-offs because it is convenient and gets the end result faster than researching/tweaking/fixing PowerShell examples. When it comes to learning about settings and troubleshooting, PowerShell can be pretty awesome.

But PowerShell is much slower than ARM for deployments.


PowerShell common commands for Azure VMs

To get a list of resource groups in your subscription, use Get-AzureRmResourceGroup.

—–

List VMs in a subscriptionGet-AzureRmVM

Filter List:

$armVms = Get-AzurermVM | select Name, ServiceName, ResourceGroupName
$armVms

—–

List VMs in a resource group, Get-AzureRmVM -ResourceGroupName myResourceGroup

—-

Get information about a VM, Get-AzureRmVM -ResourceGroupName myRG -Name $myVM

—-

To get the virtual machine core count usage for a location: Get-AzureRmVMUsage

Manage VMs

Task Command
Start a VM Start-AzureRmVM -ResourceGroupName $myResourceGroup -Name $myVM
Stop a VM Stop-AzureRmVM -ResourceGroupName $myResourceGroup -Name $myVM
Restart a running VM Restart-AzureRmVM -ResourceGroupName $myResourceGroup -Name $myVM
Delete a VM Remove-AzureRmVM -ResourceGroupName $myResourceGroup -Name $myVM
Generalize a VM Set-AzureRmVm -ResourceGroupName $myResourceGroup -Name $myVM -Generalized

Run this command before you run Save-AzureRmVMImage.

Capture a VM Save-AzureRmVMImage -ResourceGroupName $myResourceGroup -VMName $myVM -DestinationContainerName “myImageContainer” -VHDNamePrefix “myImagePrefix” -Path “C:\filepath\filename.json”

A virtual machine must be prepared, shut down and generalized to be used to create an image. Before you run this command, run Set-AzureRmVm.

Update a VM Update-AzureRmVM -ResourceGroupName $myResourceGroup -VM $vm

Get the current VM configuration using Get-AzureRmVM, change configuration settings on the VM object, and then run this command.

https://docs.microsoft.com/en-us/azure/virtual-machines/windows/ps-common-ref

Recreate a VM with existing VHD

Steps to Delete and Recreate the VM:

Step 1: Delete the VM.

Step 2: Copy the VHD and spin-up a new VM with it.

Below are the steps to do it.

First we have to copy the VHD using AZcopy .

Using AZcopy :

Step 1 : Create a storage account in your desired Location, in a resource group

Download AzCopy here.

Use the following AzCopy command and run the command as shown below:

To copy entire disks in the storage account

AzCopy /Source:https://sourceaccount.blob.core.windows.net/mycontainer1 /Dest:https://destaccount.blob.core.windows.net/mycontainer2 /SourceKey:key1 /DestKey:key2 /S                   

To copy only one disk, please give the name of the disk in pattern

AzCopy /Source:https://sourceaccount.blob.core.windows.net/mycontainer1 /Dest:https://destaccount.blob.core.windows.net/mycontainer2 /SourceKey:key1 /DestKey:key2 /Pattern:abc.vhd

Where Source is

Go to https://portal.azure.com/ , Source storage account> Blobs > Container >Copy the URL


The source URL looks like : https://storageaccountname.blob.core.windows.net/mycontainer1

The grey highlighted part should go into the Source: section of the AzCopy command.

  1. SourceKey:

From the portal, select the source storage account > Access Keys

You can select either the primary or secondary and enter it into the SourceKey: section of AzCopy command.

  1. Destination:

From the portal again, select Destination Storage Account >Blobs ><>

The blob address followed by /mycontainer2 goes into the Destination: part of the AzCopy command.

Example : https://DestinationStorageAccountName.blob.core.windows.net/mycontainer2

  1. DestinationKey:

Select the destination storage account in the portalàAccess Keys àSelect either key1 or key2

Enter it into the DestinationKey: section of AzCopy command

Once the Azcopy command entered with all the required details. Go ahead and run the AzCopy command in the downloaded tool(Microsoft azure storage tools) >Run as an administrator>copy the command there.

Note: It will take few hours to complete the operation. You know the command is working when the transfer speed is changing.

Ensure that the transfer is done successfully by checking the Destination Storage account container in the Azure Portal.

Once the .VHD/disks are copied successfully to the destination storage account, then you have to recreate the VM by following the below steps :

You can use ARM Template instead of using PowerShell commands to Recreate a VM by following the below steps :

After the above activities are done, you can proceed to create a VM using the copied VHD. Open your Destination Subscription & login :

  1. From Portal, click on New> Template Deployment.
  2. Select template deployment and click on Create.
  3. Click on edit template as shown below

NOTE :This is only possible in ARM deployment model .

  1. Click on Quick start templates >search for ‘201-VM-specialized-vhd-existing-vnet’
  2. Accept terms and conditions and click ‘Purchase’ to start the VM deployment
  3. Post deployment VM will be running successful.
How to create a new VM using existing VM disk

Summary: take snapshot of VM OS disk, create disk of snapshot, create vm using disk.

1) If the disk is managed, use Azure portal to take a snapshot

  1. Sign in to the Azure portal.
  2. Starting in the upper-left, click New and search for snapshot.
  3. In the Snapshot blade, click Create.
  4. Enter a Name for the snapshot.
  5. Select an existing Resource group or type the name for a new one.
  6. Select an Azure datacenter Location.
  7. For Source disk, select the Managed Disk to snapshot.
  8. Select the Account type to use to store the snapshot. We recommend Standard_LRS unless you need it stored on a high performing disk.
  9. Click Create.

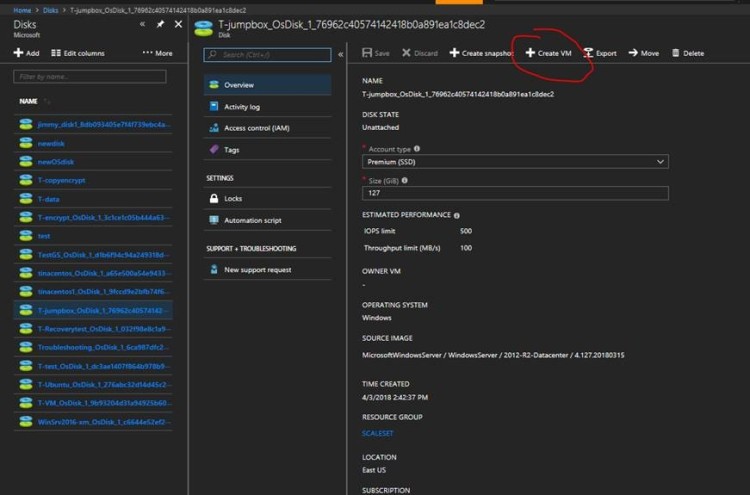
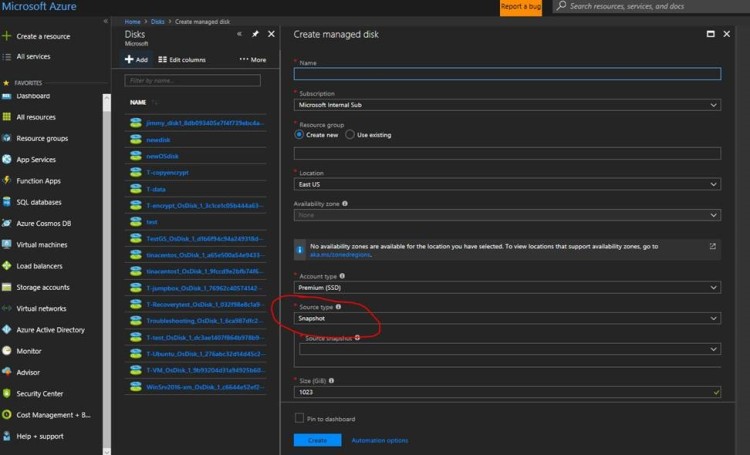
2) Create a new managed disk using the snapshot.

All services – disk – add – chose the snapshot you created – create

s1

3) Create new Vm from the managed disk

s2.jpg

By this way , you can get a new vm with different size.

How to login to Azure via PowerShell

– Either Add-AzureAccount (You can add as many accounts)

– or Get-AzurePublishSettingsFile

Import-AzurePublishSettingsFile C:\Users\GS\Spark-11-5-2015credentials.publishsettings

Run following cmdlet to check if you are connected successfully:

Get-AzureAccount / Get-AzureSubscription

To remove an account: Remove-AzureAccount -Name abc@xyz.com

https://www.tutorialspoint.com/microsoft_azure/microsoft_azure_powershell.htm